Topic: DMD0355

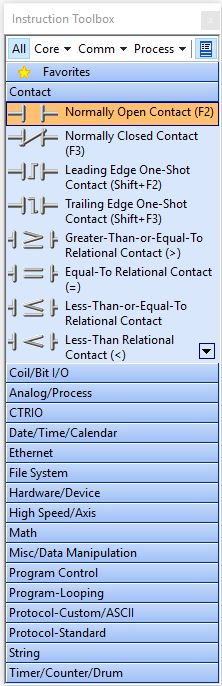
Instruction Toolbox
|
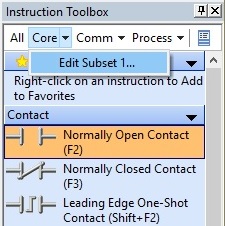
The Instruction Toolbox is a Dockable
The Toolbox has an entry for each instruction that is available for use based on the CPU type. Do-more CPUs have an extensive and varied instruction set. To help manage that size and complexity, the Toolbox organizes the instructions and wire drawing commands into "drawers" based on the instruction's class. Left-Click on the name of a drawer to "open" it and display the list of instructions in that drawer. Left-Click it again to "close" the drawer.
While a drawer is open, any instruction in that drawer can be added to the ladder logic diagram by either a drag-and-drop operation with the mouse, or placing the edit cursor where you want the instruction and double-clicking on the instruction in the toolbox. In either case, once the instruction is placed in the ladder diagram its editor will be automatically be opened ready for you to enter the required parameters. Refer to the section
The instructions listed in the Toolbox can be filtered by using the group selectors on the toolbar to select which drawers will be shown. There are four group selectors:
The last selection on the toolbar is the "collapse all" button. When this function is enabled, all of the drawers will be "closed" so that only the drawers name are visible, meaning the instructions in the drawers are hidden. When this function is disabled, all of the drawers will be "opened" and all of the instructions in all of the drawers are visible.
|
Using the Instruction Toolbox
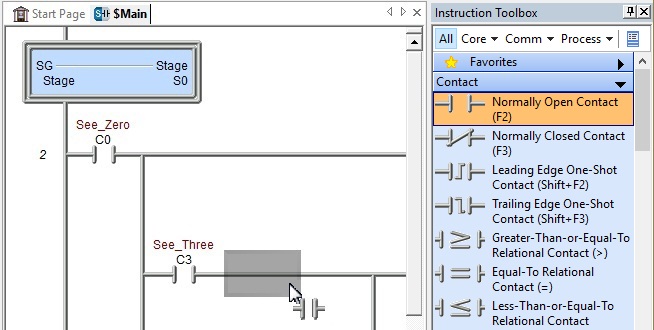
As stated earlier, there are two ways to get an instruction from the toolbox onto a ladder logic rung: you can also place the edit cursor where you want the instruction to be entered and double-click on the instruction to add it to the rung at that block cursor location, or, you can Drag and Drop![]() click and hold the mouse button down over an element, drag it to another location, and release the mouse button to drop the element there any of the instructions from any group to an appropriate place on a rung. Notice that when performing a drag and drop operation, the mouse cursor will change to either a Contact, a Coil, a Box, or a wire segment depending on what is selected, and the block cursor will track along with the mouse cursor to show you where the current selected instruction will be dropped.
click and hold the mouse button down over an element, drag it to another location, and release the mouse button to drop the element there any of the instructions from any group to an appropriate place on a rung. Notice that when performing a drag and drop operation, the mouse cursor will change to either a Contact, a Coil, a Box, or a wire segment depending on what is selected, and the block cursor will track along with the mouse cursor to show you where the current selected instruction will be dropped.
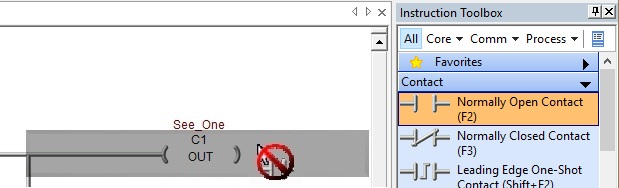
The mouse cursor will display a red circle with a slash any time you cannot drop the selected instruction at the current mouse cursor location. This is shown in the picture below of an attempt to place a Contact in the output column.
Insert Operation with a Contact
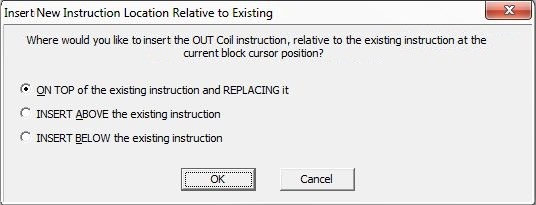
If you attempt to place a new instruction on top of an existing instruction a dialog similar to the one below will open asking you what action to take:
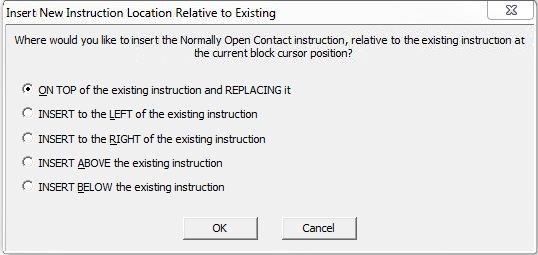
ON TOP of the existing instruction and REPLACING it will remove the instruction at the block cursor position and replace it with the new instruction.
INSERT to the LEFT of the existing instruction will insert a new column to the left of the existing instruction and place the new instruction in the new column.
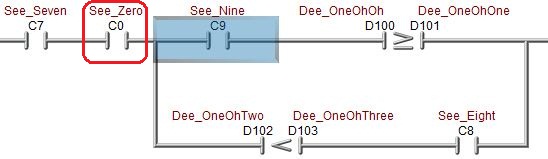
Note: if there is a vertical wire immediately to the left of the block cursor, the insert operation will place the new instruction to the left of the wire, NOT to the left of the contact. In the screen shot below notice the block cursor includes the wire immediately to the left of the contact.

Here is the result after inserting a new contact C0 "TO THE LEFT OF" contact C9: again notice that it is inserted to the left of the vertical wire, NOT immediately to the left of the contact C9.
INSERT to the RIGHT of the existing instruction will insert a new column to the right of the existing instruction and place the new instruction in the clipboard in the new column.
INSERT ABOVE the existing instruction will insert a new row above the row with the block cursor and place a the new instruction in the new row at the column position of the block cursor.
INSERT BELOW the existing instruction will insert a new row below the row with the block cursor and place the new instruction in the new row at the column position of the block cursor.
Insert Operation with a Coil or Box Instruction
If the Insert operation will be performed on a rung that has a NOP in the output column, a new Coil or Box instruction be placed there will no addition input from the user. If a Coil or Box instruction already exists in the output column of that rung the following dialog will open prompting the user for the required additional information:
ON TOP of the existing instruction and REPLACING it will remove the Coil or Box instruction at the block cursor position and replace it with the new Coil or Box instruction.
INSERT ABOVE the existing instruction will insert a new row above the row with the block cursor and place a copy the new Coil or Box instruction in the output column of the new row.
INSERT BELOW the existing instruction will insert a new row below the row with the block cursor and place the new Coil or Box instruction in the output column of the new row.
Toolbox Options:
Favorites is a user-managed instruction group that allows the user to keep a copy of the instructions they use most often. You can add instructions from any of the other groups to Favorites through the right-click menu for that instruction, they can be removed from Favorites through the same right-click menu.
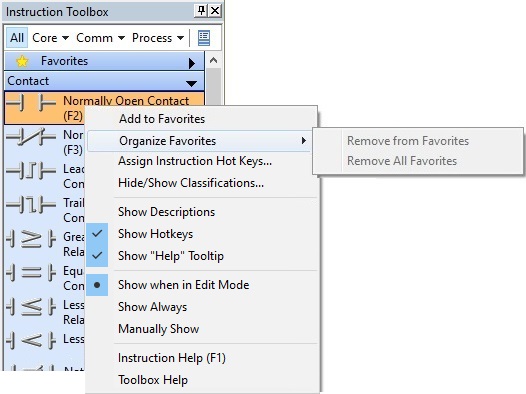
Add to Favorites adds a link to this instruction to the Favorites group.
Under Organize Favorites, Remove From Favorites will remove the selected instruction from the Favorites group, and Remove All Favorites will remove all of the instructions currently in the Favorites group.
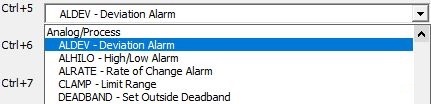
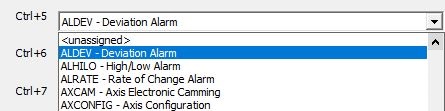
Selecting Assign Instruction Hot Keys will open a dialog that allows up to ten Hot Keys (CTRL + number) be used to quickly add instructions to a ladder diagram.

Sort Instruction Lists by selects how the list of available instructions will be displayed:
- Instruction Class will display the list of instructions sorted by Class:
- Mnemonic will display the list of instructions sorted alphabetically by instruction mnemonic:
Reset to Default will restore the default hot Key settings; Reset to Unassigned will clear all of the Hot Key Settings.
Click OK to save any changes that were made, Click Cancel to exit without saving any changes.
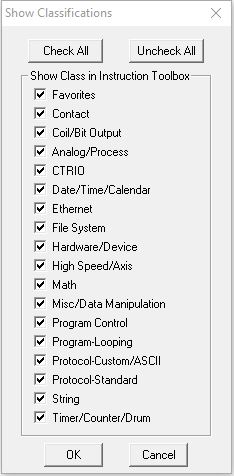
Show / Hide Classifications lets you choose which classes of instructions are displayed in the Toolbox. This does not remove the instructions from the PLC, it only prevents them from being displayed in the Toolbox. Individually uncheck the classes you want to remove from being displayed the Toolbox, or use the Check All / Uncheck All to include or exclude all of the classes.
The right-click menu for the Toolbox contains these options for what information to display along with the instruction mnemonic:
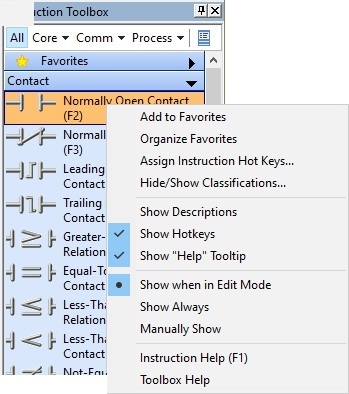
If Show Descriptionsis enabled the instruction's description is displayed along with the its mnemonic.
If Show Hot Keys is enabled the Hot Key for an instruction will be displayed in addition to its mnemonic.
Show When In Edit Mode (the default) means the Instruction Toolbox will only be visible when Do-more Designer is in Edit Mode.
Show Always means the Instruction Toolbox will always be visible.
Manually Show means the Instruction Toolbox will only be visible if you open it manually by selecting Instruction Toolbox from the Edit menu.
The right-click menu also has links to get to the Help topic for each instruction and for the Toolbox itself:
Instruction Help (F1) will show the Help topic for the currently selected instruction.
Toolbox Help will show this Help topic.
Auto Hide is enabled by clicking the small push-pin located in the upper right corner of the Toolbox (the push-pin icon will change from vertical to horizontal). It is disabled by clicking the push-pin icon again.
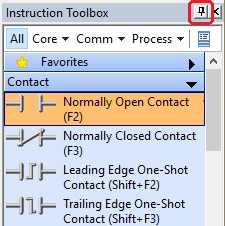
If Auto-hide is enabled, any time the mouse cursor is NOT over the Toolbox dialog the Toolbox will automatically collapse into just a tab on the edge of Do-more Designer where it is docked. It will automatically expand when the mouse cursor hovers over the tab, and will stay expanded if you click on the tab.
If disabled (the default), the Toolbox will always be fully visible when docked. This option is not available if the Toolbox is not docked.
Customizing the Groups and Instructions:
One of the most useful aspects of the instruction toolbox is the ability to fully customize the instruction set that displayed. As stated earlier, the Do-more CPUs have such an extensive and varied instruction set that many times the process of finding a particular instruction
Clicking the Subset Name and selecting Edit Subset # will open the following dialog where the name of the subset and the instructions in that subset can be changed:
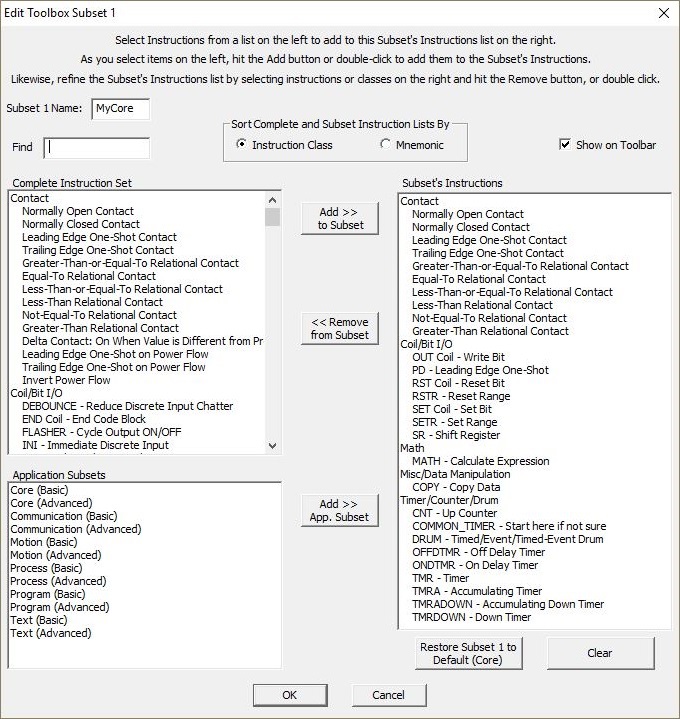
The Subset # Name will appear on the Toolbar. The Default names of Core, Comm, and Process can be changed as needed.
The Find field will search the Complete Instruction Set group for instruction's mnemonics or descriptions (either partial or complete) to help you locate instructions to add to a Subset.
The Sort Complete and Subset Instructions Lists By selects how the Complete Instruction Set and Subset's Instructions lists will be displayed in both groups:
Instruction Class will display the class names and the instructions in each class.
Mnemonic will display only the instruction mnemonics sorted alphabetically.
Enable the Show on Toolbar option to have this Subset show up on the toolbar, disabling this option will remove it from the toolbar. Right-click in the toolbar area and select Show Subset # to re-enable a hidden subset.
The Complete Instruction Set group shows all of the instructions that are available for use by any Do-more CPU - this list is NOT limited to the instructions just for the CPU specified in the project.
Highlight a single instruction, use ctrl-click to select multiple instructions, or select an entire class of instructions in the Complete Instruction Set group and click the Add >> to Subset button to add the highlighted selection to the Subset's instruction list.
Highlight a single instruction, use ctrl-click to select multiple instructions, or select a class in the Subset's Instructions group and click the Remove << from Subset button to delete the highlighted selection from the Subset's instruction list.
The Application Subsets group
Select an application subset or use ctrl-click to select multiple application subsets then click the Add >> App. to Subset button to add an entire group of instructions to the subset. The following dialog will open to confirm what to do with the existing instructions in the Subset's Instruction group:
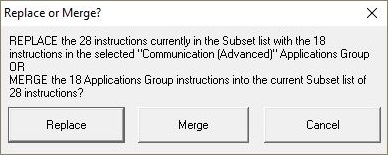
Selecting Replace will remove all of the existing classes and instructions from the Subset's Instructions list, then add the classes and instructions from the selections Application selections.
Selecting Merge will add the instructions from the selections Application selections to the existing Subset's Instructions list.
Selecting Replace will remove all of the existing instructions in then add the instructions from the selections Application selections.
The Subset's Instructions group shows the Classes and instructions that are currently in the Subset.
Clicking the Restore Subset # to Default (Core) button will restore subset's original name and instructions.
Clicking the Clear button will remove all of the instructions from the Subset Instruction group.
See Also:
Instruction Set Overview (by Class)
Instruction Set Overview (Alphabetic)